Monday, May 24, 2010

This needs more work - but it is coming along...


This has been fun to create. It has several found objects incorporated into the stained glass design. Ceramic heads from California, porcelain flowers from Green's Corner, glass gems, broken green bottle from Oklahoma City, glass beads that are purple, magenta and striped, like Zebra stripes. It all works. I still have work yet to go. I put a black patina process on all the silver solder, and need to complete this process on the back side of the design. Then I am adding more thin green vines in the empty spaces and may add more opaque cut glass leaves.

Abstract Cross


I enjoyed taking photos of this abstract cross. It stands tall in a narrow wooden frame. There are three geodes and etched metallic gold glass as accents throughout.


Thursday, May 20, 2010

Its Official! What a blessing!!!

Dear Jennifer Lynn,
Congratulations - you have been selected by our panel of jurors to show in the exhibition at Walden Fine Art for the Walking On Glass Tour at the 2010 Taos Art Glass Invitational. Although you were not among the top eight artists selected by the jury to exhibit at the Hulse-Warman Gallery, you have been selected to show in one of our primary exhibition spaces for the Walking On Glass Tour. Please reply acknowledging you have receieved this notice and are prepared to exhibit your works. Further instructions will be delivered to you in the next few days. Please do not contact the gallery until you have receieved all of your instructions for exhibtion. We look forward to exhibiting your works in the 2010 Taos Art Glass Invitational Walking on Glass Tour.
Thank you,
Delinda

Delinda VanneBrightyn
Founder and President
Board of Directos
TIGA: Taos Institute for Glass Arts, Inc.

Tuesday, May 18, 2010

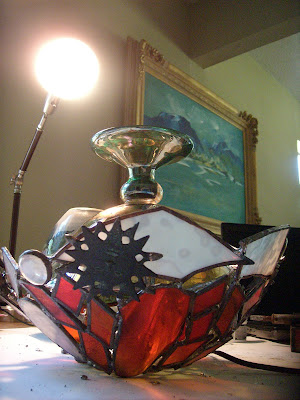
Here is the white-like glass in the lamp....


You will see below a lamp I completed today. In the pictures of the lamp, I could not get the "bone" colored glass to look in the photo the way I was seeing it. Surprise! I waited until later in the evening and went to check on my lamp. The colors had changed from before and the design I was speaking of was shining through in this light. I captured it on the camera. SO - when you look at the lamp below, think of this type of glass inside, the circular designs rolling through.

This is the beginning foundation...then I layer on more design....


I need to clean these items up, but I am hoping to put them in the piece some way.

This is the frame I am using for this design.


Maybe a flower...a "child-flower"???


Still adding found objects...


I bought this frame years ago from Walls, when they used to have their department store items on Main Street. It had a mirror in it and I used it as that, but always knew it would become a frame for something. The metal flowers extend out, different ones, and I like the muted colors. Hollyhocks are a prominent flower in New Mexico, up and around near Taos. The hollyhocks inspired this garden within me.

The doll heads are form California. In my mind, I would like to see flowers made out of them, with their face in the center of the flower. Sometimes though, an item you might like to put in doesn't hold - it just won't work. I would rather compromise over the design, but never the structure. Glass gems, from Oklahoma City. Porcelain bowl from Green's Corner, in Shawnee, Oklahoma. These are all the different founds objects I liked seeing in this piece. Next step, foil every piece, smooth out every edge...then move onto fluxing and soldering....


Putting it all together, where do I begin?


After I had fluxed, foiled and soldered every piece, I decided to get all the items together to figure out what I wanted to do. To make the crown of any lamp, you lay out the general design so that you are mindful of the big picture. Even though all the pieces are not the same, seeing the overall design helps you know where to put certain pieces so that the crown is as balanced in design as possible.

I took a bowl from my kitchen to help me get started. It is the green color you see underneath the beginning of the crown.

Adding the sun and other pieces.


Working underneath the lamp crown.


Every piece must be soldered on all sides and angles. Wherever the pieces are touching, solder was applied to strengthen the lamp.


Different sides of Sagebrush Lamp

The white looks a little to white - I know...but the color of this glass is really a tan or "bone" color. When a light is reflected directly behind it, there are circular shapes in the glass, it is also textured with a rougher surface. I wish I could have brought it out in the photo.
There are glass gems, geodes, iron cast sun faces, green limbs, orange glass from a big antique vase soldered together.


Top of Sagebrush Lamp


This is the very top.

Cool huh? I put a string of twenty twinkle lights. You probably could put more lights in, so when this string burns out, try more lights or different colors. Red, or gold colored lights would be exquisite.

Saturday, May 8, 2010

Happy Mother's Day to all Mothers, including mine.

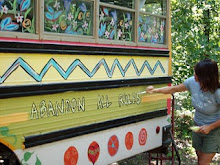
My parents came to visit me this past October. Where would I be without my Mother? She has been a powerful role model for me and so supportive of my art and life. They came out to visit me from California. In the background, you can see my Dad signing my bus/studio. It is where I break, cut, sketch most of my ideas.
I love you !


Foiling the edges

This shows me working with my wooden fid. After I have taped the foil to all the edges of the glass, I go back over it with my fid to smooth out any wrinkles. The foil is the first layer of foundation that holds all the glass pieces together.
These are all of the foiled pieces that will make the lampshade portion of my Sagebrush Lamp. "Found objects" or glass from broken vases, plates, or bowls are harder to fid than flat pieces of glass because of all the shapes and curves.


Finished foiling this design

This will be a beautiful piece when finished. There will always be a few more embellishments, but this line, I'll call my "Landscape Designs" are simple and elegant.


Green's Corner - my favorite shop to look for "found objects".

Green's Corner - Antiques, Collectibles, Primitives, Furniture, and anything miscellaneous. Located at 723 E. Main, Shawnee, Oklahoma. Owned by Ronny & Jan Green. Open Thursday - Saturday from 9:00-4:00. Buy - Sell - Trade.
I have shopped at this place for the last five years. Every time I go in there are new things to look at. I like to fold in "found objects" within my glass designs. The more whimsical and crazier - the better and this place usually always has something. When my parents came through last October, I took them by. I am afraid my Dad and I might have left my Mom behind because she wanted to look at every single thing. It is hard not to. It is the kind of place that - the more you look the more you see.

Marbles...


All kinds of glasses and vases...


So many rooms...

This room always has lots of Native American and Mexican artwork and items.
Charlie, the cashier is always there to greet you with a smile. He knows about every item for sale in the store. Where it came from, or what it is. He told me the store has been around for twenty years and all items come up through the Shawnee community although he has people from as far south as Ada who bring items to sell. One couple from Arizona used to come through Shawnee with items to sell them but not anymore. Charlie didn't want his picture taken so you'll just have to come by and meet him yourself.
These bottles used to hold liquor.

This room has lots of larger tools used today and old cast iron tools from the past.


This is the cast iron room. More tools, pots, horse shoes - you name it, its there. This was where I got the idea to hang some of my work from old ice tongs.


You walk outside, and the pieces of miscellaneous items get larger. I like to just look at everything, wondering what they are and if I can use anything within my art.


Outside...

Look at everything here - wow!!! There were still more items inside that shed to the right.
This is what I found inside the shed.
What are these things? I do not know, but they look like skyscrapers built in the 1950's to me.

Screws, bolts, all those things you men like to look through!!! ha ha


Coke bottles...hhhmmmmmmm


Charlie kept all of these little things in these drawers under the glass countertop. Old business cards, fishing lures, pins from past election years.


OKay - let me explain this skull...

For my exhibit in Taos this summer, I had considered the idea of creating a realistic in size, glass cow skull which would be three dimensional, hang from the wall with lights fed up through the middle. I wanted to use glass for the head, but use real horns somehow. I had looked at many pictures to see how I could do this. That had been my thought brewing in my mind for this project. Low and behold, I came across this cow skull and was so drawn to its overall shape and design and especially how the horns had grown. Immediately it was the image I wanted to work from - but did I want to buy a cow skull?
I looked around some more at other things and came back to this skull and I bought it. When I got it home, I lifted it up onto my porch. When I did the hard cuticle of his horns slipped off in my hands. There I was with what I needed to create my glass cow skull. I decided to soak the rest of it in some bleach water, but have now heard from my Niece that I should have used hydrogen peroxide. I have taken the skull out. It is cleaner, but hopefully not too much more brittle. I will use the shape as a model and then retire it on my property to hang proudly somewhere.
I will incorporate these two pieces in my project.


Skull soakin...